1. 材料
| 部品名 | 必要数 | 購入先 | 単価 | 費用 |
| Arduino UNO | 1個 | Amazon | 3,240円/個 | 3,240円 |
| USBケーブル A-B | 1本 | マルツ | 234円/個 | 234円 |
| 合計 | 3,474円 | |||
※その他ArduinoIDEのインストールされたPCが必要です。
2. 準備
2.1 接続
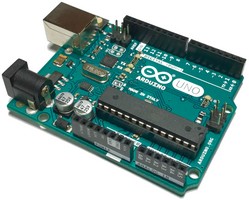
Arduino UNOとPCを図1の様にUSBケーブルで接続します。

※ArduinoIDEがインストールされたPCが必要です。

2.3 起動画面
ArduinoIDEを起動すると、図3の画面が表示されます。

図3:ArduinoIDE起動画面
2.4 使用するボードの設定
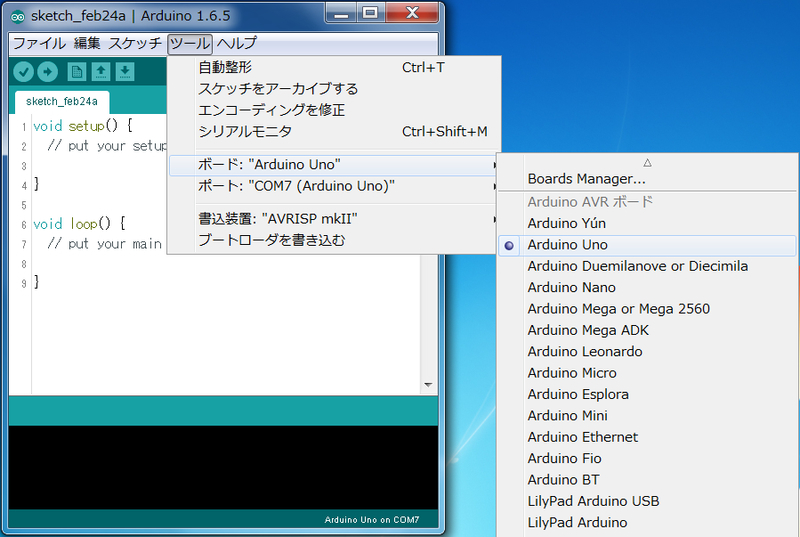
図4:ボードの選択
2.5 ポートの選択
Arduino UNOをPCに接続した際に自動的にCOMポートがArduino UNOに割り当てられます。基本的にPCがArduino UNOを自動認識後、Arduino IDEを起動し図5の様に「ツール」→「ポート」→「COM○※1(Arduino Uno)」と表示されていますのでそれを選択します。
※1:○に割り当てられる番号はPCによって同じとは限りません。
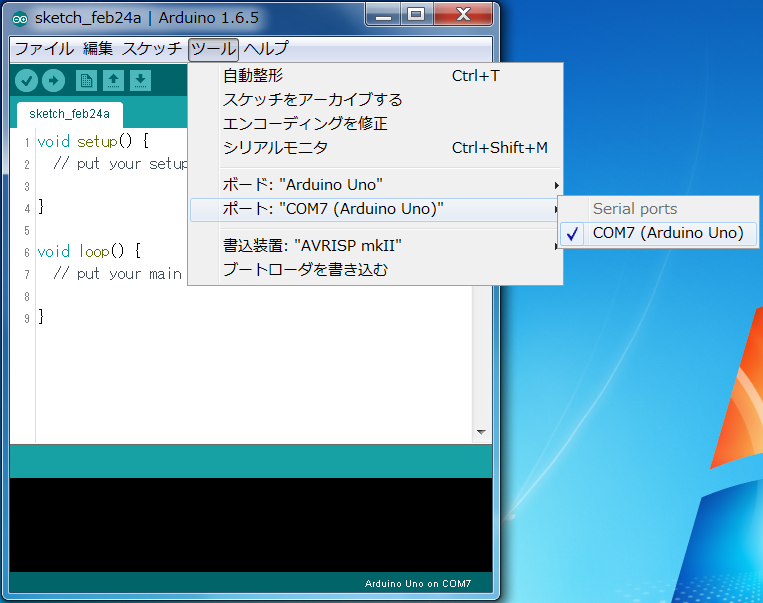
図5:Arduino UNOが接続されたポート番号の選択
2.6 サンプルスケッチの読み込み
Arduino UNOには標準でボード上にLEDが付いていますので、それを点滅させてみたいと思います。便利な事にArduino IDEには標準でサンプルスケッチ(Arduino UNOへの命令の事)がいくつか記録されておりますのでそれを使います。
図6の様に「ファイル」→「スケッチの例」→「01.Basics」→「Blink」と選択します。

図6:サンプルスケッチの選択
サンプルスケッチを読み込んだ後、図7の画面が表示されます。

/*
  Blink

  Turns an LED on for one second, then off for one second, repeatedly.

  Most Arduinos have an on-board LED you can control. On the UNO, MEGA and ZERO
  it is attached to digital pin 13, on MKR1000 on pin 6. LED_BUILTIN is set to
  the correct LED pin independent of which board is used.
  If you want to know what pin the on-board LED is connected to on your Arduino
  model, check the Technical Specs of your board at:
  https://www.arduino.cc/en/Main/Products

  modified 8 May 2014
  by Scott Fitzgerald
  modified 2 Sep 2016
  by Arturo Guadalupi
  modified 8 Sep 2016
  by Colby Newman

  This example code is in the public domain.

  http://www.arduino.cc/en/Tutorial/Blink
*/

// the setup function runs once when you press reset or power the board
void setup() {
  // initialize digital pin LED_BUILTIN as an output.
  pinMode(LED_BUILTIN, OUTPUT);
}

// the loop function runs over and over again forever
void loop() {
  digitalWrite(LED_BUILTIN, HIGH);   // turn the LED on (HIGH is the voltage level)
  delay(1000);                       // wait for a second
  digitalWrite(LED_BUILTIN, LOW);    // turn the LED off by making the voltage LOW
  delay(1000);                       // wait for a second
}

図7:サンプルスケッチ(Blink)を読み込んだ画面
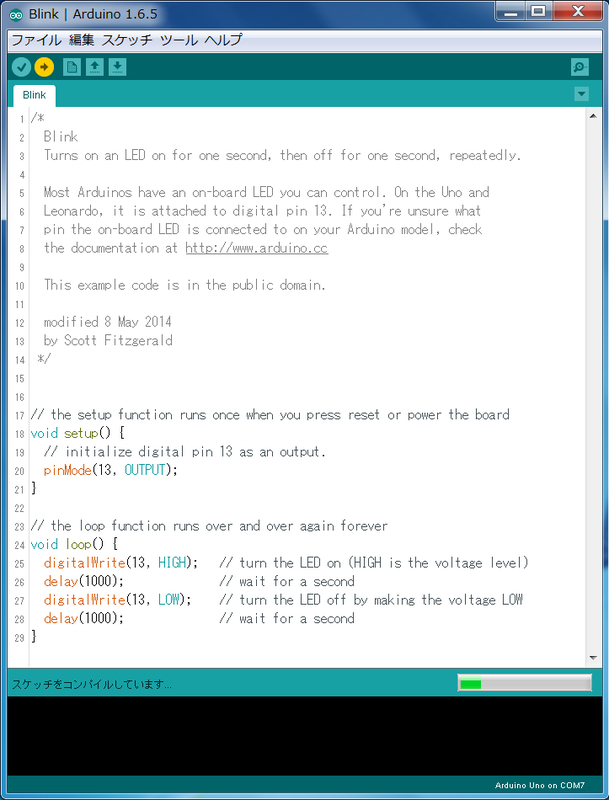
図8:Blinkスケッチのコンパイル状態

図9:マイコンボードへ書き込み完了画面
2.8 Arduino UNOのLED点滅
図10より、13番ソケット(写真上側に「13」と印字されている所)の下あたりにLと印字されており、その右横に小さいLEDが付いています。このLEDは内部で13番ソケットに接続されており、13番ソケットがONの時点灯しOFFの時消灯します。
つまりLEDをわざわざ買ってこなくてもArduino UNOだけでLEDの点滅する回路が既に用意されているのです。
1秒周期でLEDがON(図11)・OFF(図10)点滅するようになりました。


2.9 LEDの点滅速度を変える
スケッチ(図9)の26,28行目に「delay(1000);」と書かれております。この数字はArduino内で行われている命令の実行を1秒間(1000ms)待たせるものです。0.5秒待たせたかったら26,28行目を「delay(500);」と修正して書き込むことで点滅が倍速になります。